Hi, as you may have noticed, or maybe you didn't and you're hearing it here for the first time. I have changed the name of my blog to "Creative Hands Design". Why is this you may wonder (or maybe you don't so you can't stop reading now but if you do care carry on reading) why?! I have changed it so that it matches the name on my business cards as well as my soon to be website "Creativehands.design" Having everything with the same name is helpful for people to find me and not get lost in the...."how do you spell that?" circle of confusion. I know I spelt "designs" wrong before when I spelt it d'zines. I thought it was creatively funny.
Anyways moving on. This blog is still basically going to be about my hobbies, crochet and card making. It's also going to have a few posts about nail design. Some of you may know I have taken on a roll with GelMoment. A toxic free, fast and easy to use gel polish company! No base coat or top coat required. Manicure done in 10 minutes with salon quality that lasts up to 2 weeks. There that's my pitch! If you want to learn more just hit me up, I love to talk about it!
I'm so happy to have you here and I hope you have found a smile on your face at some point today!
Chat soon,
Michelle
Tuesday 26 November 2019
Thursday 7 November 2019
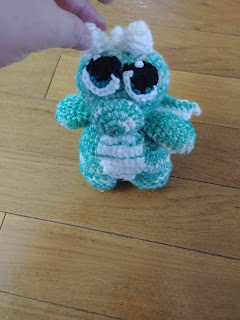
Eye Glass Holders

Hello everyone! Long time no post. There's a good reason. I've been a little busy making some really fun characters to sell at my kids' school craft fair this winter. I wanted to make something that was funny and cute but also practical, useable and different from what you would typically see at a craft fair. Without taking up too much time let's just get to it. The pattern is listed down below if you're interested in making these too. I just kind of made most of it up in my head except for the eyes I followed a youtube tutorial. There are a couple of parts that I didn't write a pattern for so they are unlisted because I can't remember what I did for them, ie the unicorn horn or elephant trunk.


The Body/Ball:
R1: Magic Circle, 6sc into magic circle and join
R2: 2sc in each stitch
R3: *2sc 1sc* repeat around
R4: *2sc 1sc 1sc* repeat around
R5: *2sc 1sc 1sc 1sc* repeat around
R6: *2sc 1sc 1sc 1sc 1sc* repeat around
R7: *2sc 1sc 1sc 1sc 1sc 1sc* repeat around
R8: *2sc 1sc 1sc 1sc 1sc 1sc 1sc* repeat around
R9: *2sc 1sc 1sc 1sc 1sc 1sc 1sc 1sc* repeat around
R10: *2sc 1sc 1sc 1sc 1sc 1sc 1sc 1sc 1sc* repeat around
R11: *2sc 1sc 1sc 1sc 1sc 1sc 1sc 1sc 1sc 1sc* repeat around
R12: *2sc 1sc 1sc 1sc 1sc 1sc 1sc 1sc 1sc 1sc 1sc* repeat around
R11-20: 1sc in each stitch
Time to decrease
R21: *1sc in first 10 stitches then sc2tog* repeat around
R22: *1sc in first 9 stitches then sc2tog* repeat around
R23: *1sc in first 8 stitches then sc2tog* repeat around
R23: *1sc in first 7 stitches then sc2tog* repeat around
R24: *1sc in first 6 stitches then sc2tog* repeat around
R25: *1sc in first 5 stitches then sc2tog* repeat around
R26: *1sc in first 4 stitches then sc2tog* repeat around
R27: *1sc in first 3 stitches then sc2tog* repeat around
R28: *1sc in first 2 stitches then sc2tog* repeat around
R29: sc2tog around until gap is closed fasten off and weave in ends.
The eyes: (Owl eyes)
(With black yarn)
R1: magic circle with 6sc inside, join together and ch1
(change to eye colour desired for row 2)
R2: 2sc in each stitch join and ch1
(Change to white)
R3: 2sc in each stitch fasten off leave a long tail for sewing onto project
The eyes: (Smaller eyes) I followed this youtube tutorial
https://www.youtube.com/watch?v=iqu9tWXEuM0&t=349s
The Nose and Ears are the same pattern.
Need 2 ears and one nose for 1 character:
R1: Magic circle with 6sc inside
R2: 2sc in each st
R3: *2sc 1sc* around
R4: *2sc 1sc 1sc* repeat around
R5: *1sc in each st around
R6: *1sc 1sc sc2tog* repeat around
R7: *1sc sc2tog* repeat around leave a long tail for sewing on project and fasten off.
I stuffed the nose and then folded the ears in half and sewed them on
If you have any questions just shoot
Happy crochet day, now go get knotty
Chelle
Saturday 18 May 2019
Why Chelle's D'Zines?
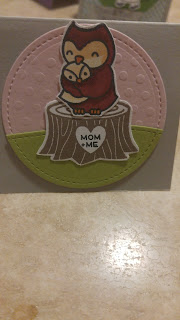
Good day everyone! I hope everyone is happy and healthy! Today's post is more of a picture update on some of my latest projects. I am excited as the school year is coming to an end. So many excuses to get in the craft corner and make some year end teacher thank you cards. My love language is definitely gifts (giving not so much receiving). I love picking up hints from people (especially when they are unaware of giving them) and then surprising them with something they may have mentioned they wanted in passing. It is so much fun to see their faces when they open it. I get so much joy from it. I have no idea what we are going to get our teachers as of yet but it's crunch time so that will be our focus in the next couple of weeks. Look forward to some pictures and updates on those!
I was recently asked, "why Chelle's D'Zines" as my business name. Well the name "Chelle" pronounced "Shell" comes from what my brother use to call me. He wasn't able to say my full name. I absolutely loved being called Chelle. D'Zines came from me being cheeky and wanting to play with the spelling of "designs". So that's where the name comes from.
Now for the pictures. I hope you enjoy, get inspired and craft your happineess!
Love
Chelle


Tuesday 23 April 2019
The Stamp and Scrapbook Expo in Pleasanton, CA
Hello One Year Later! I can not believe it's been a year since the last time I updated this blog! Since I've been leaving you hanging long enough now seems like a good time to get back into it. Let's just start with some more recent activity and pick it up from there. Back in March I had the opportunity to join my hubby, B, on a work trip in San Francisco. It lined up with the Stamp and Scrapbook Expo in Pleasanton, CA and I have to say it was well worth the trip down! I was able to see some of my favourite stamp companies and meet the owners and the people behind the scenes. I made my husband wake up at 6:30 on a Saturday so we could drive the 25 minute drive and be early. They had said those lined up between 8 and 9 would get a golden ticket. I had bought our tickets online and yes I bought him a ticket to go in too because I wanted him to see the hype. So we both received a golden ticket to put into a draw of our choosing for a grand prize. (They had a bunch of prizes and you pick which draw you would like to enter). After analyzing all the prizes I picked the one I would most likely use the most of and put both of our tickets into the bin. As soon as I put our little slivers of paper into the bin I realized I hadn't folded them or anything so I shrugged it off as an instant loss and carried on with our day. I looked around the entrance at all the signs and information. Then I saw 9 people standing outside in the rain in a line. I figured I might as well go join them. When I got to the end of the line I said, "I don't know why we're lining up but this looks like a good place to be." One of the ladies in front of me turned and said, "We're lining up to go shopping". I figured I'm in the right spot then. I tried to engage with the group ahead of me but they were busy talking about something they all related on. So I turned behind me and tried to engage with the group behind me. It was very similar to the previous group. So as an overexcited little puppy I bounced in my spot and smiled and just enjoyed the rain. They decided to try something new and bring everyone inside to wait for the shopping part of the expo to begin. It was an interesting social experiment. I enjoyed the people watching. My husband found me inside (not where he left me as he had gone to find a washroom).
Some of the vendors came out and delivered coupons that were valid at certain times of the day. One of the behind the scenes workers from The Stamps of Life came out to deliver. As soon as I saw her I asked her if she was so and so and she said yes. I have to admit I went a little fan girl crazy on her and gave her the card I had made for her.
 (I had corresponded with her a few times and it was just so nice to put a face to a name). Before they opened the expo for shopping they explained a few events that were going on in the day. They would randomly call a number out over the P.A. system and if you were standing on the number called you would receive a prize. Also if you won any of the door prizes through out the day they would announce it but would also post it on a white board so to check that throughout the day too because you may have missed it being called yada yada yada.. Then they finally opened the Expo for our shopping pleasure. I had a workshop that started at 10 so I had 45 mins to shop and then get to my class. I hit up the first 3 booths on my wishlist. The third one I hit up was The Stamps of Life booth. I delivered the card I had made for Stephanie
 and the card I made for the design team.
 I had also brought a few Canadian treats (Smarties - which are different than what they call Smarties and KinderEggs.)
Then headed off to my first workshop of the day. (I had signed-up for 3). B's intentions were to come with me for a short time and then go to a coffee shop to work for the day. With the rain coming down he decided to just go sit in the car until the first workshop was done. As I neared my classes location I realized that my ticket to get into the class was still in the bag that he had taken to the car. So I turned and jogged over to the car. It being a rental I couldn't remember what it looked like. Luckily as he was putting the bag in the car he realized that he had the ticket and started to head in my direction. We met and did the trade off and I ran back to my class.
The workshop was Amazing!!! I had so much fun learning the techniques and the amount of goodies they give you in the goodie bag is astounding! Pattern paper pads, markers, dies, stamps, embellishments. It's just over all awesome! The girl beside me won the door prize which I think I may have been more excited about than she was. She was quite reserved. I felt like sitting so close to the winner made me so much closer to being a winner too. After making 3 cards the workshop came to an end. As I walked out my husband was standing right there and we went to walk around for a quick 30 minutes until my next workshop began. I had wished the workshops were a little more spaced out but that's just how the timing worked out for the ones that I wanted to participate in.
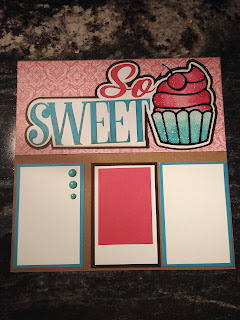
B asked me if I wanted some lunch and he would bring it to me in my class. I ran to class (literally jogged) as I was running a little late because I had gotten carried away at staring at all the wonderful product in the Cre8tive Artz booth. When I arrived I walked in and went straight to the front of the class. Then I remembered that B was coming with my lunch so I went back to the back of the class so he would be able to find me without interrupting the class time. Again I may have been a little over zealous with expressing my excitement. At one point the instructor said, "instead of yelling out we'll just use happy hands". And she demonstrated the silent cheer with her hands. I wasn't sure if this was to get me to be more quiet or to get the other classmates to participate. It didn't keep me quiet, if that was her intent, as I yelled out, "I have happy hands" every time I used them. Obnoxious maybe. Did I have a fabulous time playing with crafts in the middle of the afternoon without my children interrupting me? YES! What a fun class. They introduced us to some new products that I had never seen before like the peel off stickers. I know what you're thinking. Stickers?! Seriously? But let me tell you they are so much fun! You peel them off and stick them on your project (they are the outline of your image) and then you colour them in. We stuck ours on glitter paper and then used copic markers to fill them in and blend. They turned out so great. They gave away so many fun products to try at home. It's great because they are things I would have just walked by and paid no attention to, to be honest. But because we had a chance to try them out and play I fell in love. I gave some to my friend S when I arrived home and she also fell in love with them. Stickers, who knew right?! Here's a link to the product here: Outline Stickers
And here's a picture of what my project came out like. (The cupcake and cherry are the outline stickers).
When the second workshop was finished I came out to a very excited hubby. He had gone walking around the expo while I was busy "working". He had a few items that he just needed me to see. I pumped the brakes a little and said that I had a few places I wanted to hit up for sure before going to see his items. When I listed off the last 3 wishlist places off my list he got so much more excited because those were the places he had seen these must see things. It was so sweet to see him so excited. We did some shopping. They started to do the golden ticket draws and B said he was going to go and check it out. I was engrossed at looking at the hundreds of brads at the very back of the expo so I opted to keep looking. When he returned my response was, "Shut-Up! How are we going to get that home" I had one the golden ticket prize from Rubbernecker Stamps. Inside was over $300 worth of product and again stuff I would never have picked on my own. I loved that I was being pushed out of my comfort zone with product. It opened my eyes to see how much of a beginner I really am. Instead of feeling intimidated I feel excited and very much like a really excited little puppy. Luckily the items were just taped to a foam board so it collapsed quite nicely and fit in my suitcase just fine. Here's a picture of the loot:
 I have to say I would never have chosen the water colour powder or the stamps but I absolutely love them!! They stamp so clean and smooth. The colours are oober vibrant and are so much fun to play with in so many ways! Maybe I'll do a video on that soon! The nesting dies are what sold me on putting my ticket in and I think they are great! Can't go wrong with nesting dies ever! And the x pattern around the square ones is such a lovely detail. I have yet to try the bow maker. I tend to shy away from new contraptions for a while until I get up the nerve to try them out. My KitchenAid Mixer, CrockPot, Instant Pot, SideKick, now the bow maker. How about this, if I get 3 comments on this blog entry I will over come my fear and make a video of me using it. Woah!
It was time to head to my 3rd and final workshop. This one was being taught by Stephanie from The Stamps of Life. I was over the moon excited. You see I have been following her for about 5 years now. My friend S first introduced me to stamping 5 years ago at bible study and I liked it so much I searched for something on youtube and up popped a 30 second card in 5 minutes video. It was quirky and funny and seriously she just reminds me of my sister so I really enjoyed watching her. Then as I watched I started to learn techniques and product and there started my new addiction. This was the one workshop I was really really excited to take part in. I sat beside this really nice lady and warned her that I am a little over the top. Turns out she was too (She's a hula hoop competitor) so as two peas in a pod we giggled and just straight up enjoyed the experience. We learned some new techniques to do with older product (that I already have so it rejuvenated them). She also showed us some new product and we got a really fun goodie bag. Seriously so much product and all stuff I absolutely love! This workshop was a watch and listen lecture. It was like watching one of her videos but she was live! How fun! Then I won one of the door prizes. It was the Star Flip-it set. She is just as lovely in person as she appears on her videos. Her team is stellar and just delightful. It was fabulous meeting them all.
After the workshop B and I just walked around and checked things out and shopped and chatted with people. There was no lack of anything to do. Most booths had some sort of make and take activity. They also had another mini class going on most of the time near the back. They had a game going on periodically where they would say a number and if you were standing on the number located on the floor then you won a prize. I loved hearing the little cries of joy coming from random places in the warehouse.
The day went until 5pm and we left at 4:45. We just ran out of steam but man alive that was probably one of the most fun days. If you ever get the chance to go to a Stamp and Scrapbook Expo I would highly recommend going. There was so much we didn't do but that's what next year is for. I came away feeling so happy with the experience. I think the part that really got it for me was meeting the dreamers(owners) behind these companies. Having the opportunity to putting a face to name, having some personal chats with each of them was definitely the highlight. I love hearing people's stories, everyone has one. Leave a comment telling us how you got started in your hobby!
Until next time,
Chelle
from Chelle's D'Zines
Some of the vendors came out and delivered coupons that were valid at certain times of the day. One of the behind the scenes workers from The Stamps of Life came out to deliver. As soon as I saw her I asked her if she was so and so and she said yes. I have to admit I went a little fan girl crazy on her and gave her the card I had made for her.


Then headed off to my first workshop of the day. (I had signed-up for 3). B's intentions were to come with me for a short time and then go to a coffee shop to work for the day. With the rain coming down he decided to just go sit in the car until the first workshop was done. As I neared my classes location I realized that my ticket to get into the class was still in the bag that he had taken to the car. So I turned and jogged over to the car. It being a rental I couldn't remember what it looked like. Luckily as he was putting the bag in the car he realized that he had the ticket and started to head in my direction. We met and did the trade off and I ran back to my class.
The workshop was Amazing!!! I had so much fun learning the techniques and the amount of goodies they give you in the goodie bag is astounding! Pattern paper pads, markers, dies, stamps, embellishments. It's just over all awesome! The girl beside me won the door prize which I think I may have been more excited about than she was. She was quite reserved. I felt like sitting so close to the winner made me so much closer to being a winner too. After making 3 cards the workshop came to an end. As I walked out my husband was standing right there and we went to walk around for a quick 30 minutes until my next workshop began. I had wished the workshops were a little more spaced out but that's just how the timing worked out for the ones that I wanted to participate in.
B asked me if I wanted some lunch and he would bring it to me in my class. I ran to class (literally jogged) as I was running a little late because I had gotten carried away at staring at all the wonderful product in the Cre8tive Artz booth. When I arrived I walked in and went straight to the front of the class. Then I remembered that B was coming with my lunch so I went back to the back of the class so he would be able to find me without interrupting the class time. Again I may have been a little over zealous with expressing my excitement. At one point the instructor said, "instead of yelling out we'll just use happy hands". And she demonstrated the silent cheer with her hands. I wasn't sure if this was to get me to be more quiet or to get the other classmates to participate. It didn't keep me quiet, if that was her intent, as I yelled out, "I have happy hands" every time I used them. Obnoxious maybe. Did I have a fabulous time playing with crafts in the middle of the afternoon without my children interrupting me? YES! What a fun class. They introduced us to some new products that I had never seen before like the peel off stickers. I know what you're thinking. Stickers?! Seriously? But let me tell you they are so much fun! You peel them off and stick them on your project (they are the outline of your image) and then you colour them in. We stuck ours on glitter paper and then used copic markers to fill them in and blend. They turned out so great. They gave away so many fun products to try at home. It's great because they are things I would have just walked by and paid no attention to, to be honest. But because we had a chance to try them out and play I fell in love. I gave some to my friend S when I arrived home and she also fell in love with them. Stickers, who knew right?! Here's a link to the product here: Outline Stickers
And here's a picture of what my project came out like. (The cupcake and cherry are the outline stickers).

When the second workshop was finished I came out to a very excited hubby. He had gone walking around the expo while I was busy "working". He had a few items that he just needed me to see. I pumped the brakes a little and said that I had a few places I wanted to hit up for sure before going to see his items. When I listed off the last 3 wishlist places off my list he got so much more excited because those were the places he had seen these must see things. It was so sweet to see him so excited. We did some shopping. They started to do the golden ticket draws and B said he was going to go and check it out. I was engrossed at looking at the hundreds of brads at the very back of the expo so I opted to keep looking. When he returned my response was, "Shut-Up! How are we going to get that home" I had one the golden ticket prize from Rubbernecker Stamps. Inside was over $300 worth of product and again stuff I would never have picked on my own. I loved that I was being pushed out of my comfort zone with product. It opened my eyes to see how much of a beginner I really am. Instead of feeling intimidated I feel excited and very much like a really excited little puppy. Luckily the items were just taped to a foam board so it collapsed quite nicely and fit in my suitcase just fine. Here's a picture of the loot:

It was time to head to my 3rd and final workshop. This one was being taught by Stephanie from The Stamps of Life. I was over the moon excited. You see I have been following her for about 5 years now. My friend S first introduced me to stamping 5 years ago at bible study and I liked it so much I searched for something on youtube and up popped a 30 second card in 5 minutes video. It was quirky and funny and seriously she just reminds me of my sister so I really enjoyed watching her. Then as I watched I started to learn techniques and product and there started my new addiction. This was the one workshop I was really really excited to take part in. I sat beside this really nice lady and warned her that I am a little over the top. Turns out she was too (She's a hula hoop competitor) so as two peas in a pod we giggled and just straight up enjoyed the experience. We learned some new techniques to do with older product (that I already have so it rejuvenated them). She also showed us some new product and we got a really fun goodie bag. Seriously so much product and all stuff I absolutely love! This workshop was a watch and listen lecture. It was like watching one of her videos but she was live! How fun! Then I won one of the door prizes. It was the Star Flip-it set. She is just as lovely in person as she appears on her videos. Her team is stellar and just delightful. It was fabulous meeting them all.
After the workshop B and I just walked around and checked things out and shopped and chatted with people. There was no lack of anything to do. Most booths had some sort of make and take activity. They also had another mini class going on most of the time near the back. They had a game going on periodically where they would say a number and if you were standing on the number located on the floor then you won a prize. I loved hearing the little cries of joy coming from random places in the warehouse.
The day went until 5pm and we left at 4:45. We just ran out of steam but man alive that was probably one of the most fun days. If you ever get the chance to go to a Stamp and Scrapbook Expo I would highly recommend going. There was so much we didn't do but that's what next year is for. I came away feeling so happy with the experience. I think the part that really got it for me was meeting the dreamers(owners) behind these companies. Having the opportunity to putting a face to name, having some personal chats with each of them was definitely the highlight. I love hearing people's stories, everyone has one. Leave a comment telling us how you got started in your hobby!
Until next time,
Chelle
Wednesday 11 April 2018
Baby Boots Pattern
Shoe Sole:
Row 1: chain 13
Row 2: in second chain from hook 2hdb 1hdb in next 11 stitches, 4hdb in last stitch; (now you'll be on the other side of round) 1hdb in the one loop all the way back, 2hdb in last stitch, slip stitch to join
(find the centre stitch at toe end, mark 3 stitches in either direction)
Row 3: chain 1, 2 hdb in first stitch, 1hdb in each stitch up to marker; 2 hdb in each stitch from marker 1 to final marker, 1 hdb in each stitch to end, 2 hdb in final stitch slip stitch to join
(find center stitch at toe, mark 6 stitches in either direction)
Row 4: chain 1, 2hdb in first stitch, 1hdb in each stitch up to first marker, 2hdb in each stitch from marker 1 to marker 3, 1hdb in each stitch to end, 2hdb in final stitch, slip stitch to join. Fasten off and weave in ends
Booty Body:
Row 6: colour change. sc on, tie a knot to fasten on. 1sc around the back post all the way around, slip stitch to join, chain 1 and flip work over
Row 7: 1 sc all the way around, slip stitch to join
(Find centre of toe, mark 6 stitches on either side)
Row 8: chain 1, 1hdb in each stitch to first marker; 2hdc2together 3times, 1 hdb in centre stitch, 2hdb2together 3times (to last marker) 1hdb in stitches back to beginning slip stitch to join
(Find centre of toe, mark 6 stitches on either side)
Row 9: chain 1, 1 hdb in each stitch to first marker; 2hdb2together 3 times, 1hdb in center stitch, 2hdb2together 3 times(to last marker) 1 hdb in each stitch back to beginning, slip stitch to join
(Find center of toe, mark 2 stitches on either side)
Row 10: ch1, 1hdb in each stitch leading up to marker. 1hdb2together, 1 hdb, 1 hdb2together, 1hdb in each stitch to the end, slip stitch to join
Row 11: 1sc in each stitch around, slip stitch to join
Cuff:
Row 12: ch 24, In second stitch from hook 1 hdb, 1 hdb in each stitch to end,
Row 13: ch1 turn work in back loop only 1hdb in each stitch to end
Row 14-17 repeat row 13
Fasten off weave in ends
If you would like the video tutorial just click here: https://www.youtube.com/edit?o=U&video_id=eCzCxKdf9Tk
Row 1: chain 13
Row 2: in second chain from hook 2hdb 1hdb in next 11 stitches, 4hdb in last stitch; (now you'll be on the other side of round) 1hdb in the one loop all the way back, 2hdb in last stitch, slip stitch to join
(find the centre stitch at toe end, mark 3 stitches in either direction)
Row 3: chain 1, 2 hdb in first stitch, 1hdb in each stitch up to marker; 2 hdb in each stitch from marker 1 to final marker, 1 hdb in each stitch to end, 2 hdb in final stitch slip stitch to join
(find center stitch at toe, mark 6 stitches in either direction)
Row 4: chain 1, 2hdb in first stitch, 1hdb in each stitch up to first marker, 2hdb in each stitch from marker 1 to marker 3, 1hdb in each stitch to end, 2hdb in final stitch, slip stitch to join. Fasten off and weave in ends
Booty Body:
Row 6: colour change. sc on, tie a knot to fasten on. 1sc around the back post all the way around, slip stitch to join, chain 1 and flip work over
Row 7: 1 sc all the way around, slip stitch to join
(Find centre of toe, mark 6 stitches on either side)
Row 8: chain 1, 1hdb in each stitch to first marker; 2hdc2together 3times, 1 hdb in centre stitch, 2hdb2together 3times (to last marker) 1hdb in stitches back to beginning slip stitch to join
(Find centre of toe, mark 6 stitches on either side)
Row 9: chain 1, 1 hdb in each stitch to first marker; 2hdb2together 3 times, 1hdb in center stitch, 2hdb2together 3 times(to last marker) 1 hdb in each stitch back to beginning, slip stitch to join
(Find center of toe, mark 2 stitches on either side)
Row 10: ch1, 1hdb in each stitch leading up to marker. 1hdb2together, 1 hdb, 1 hdb2together, 1hdb in each stitch to the end, slip stitch to join
Row 11: 1sc in each stitch around, slip stitch to join
Cuff:
Row 12: ch 24, In second stitch from hook 1 hdb, 1 hdb in each stitch to end,
Row 13: ch1 turn work in back loop only 1hdb in each stitch to end
Row 14-17 repeat row 13
Fasten off weave in ends
- Fold cuff in half with lines vertical
- Sew together, through back loop on the side closest to you and front loop on other side, leave a long tail and fasten off
- Flip inside out
- Sew onto baby booty
- Fold cuff down
- Sew on Buttons
- Put on baby's foot
- Cheer - you did it!
If you would like the video tutorial just click here: https://www.youtube.com/edit?o=U&video_id=eCzCxKdf9Tk
Thursday 22 March 2018
A New Development
Hi everyone. There have been many new projects that were completed during my absence from the blog so I have a lot to catch you up on. But one very exciting new development to share with you first. I have started a youtube channel showcasing some of my crazy creative process. I am just getting use to some of the technical items and there's a steep learning curve...aka my first video is upside down. But it is a lot of fun to learn and play and I would love to have you join me. If you would like to watch the videos you can click the link below and it shall take you straight to the video. Or if you would like notifications of when I post a new video just subscribe and youtube will alert you when there's a new one to watch. I'm trying to record a new video each Monday evening and then have it edited and posted for Friday's. Why on Monday's you ask, (maybe you didn't ask but I'm going to tell you anyways), Monday's are when my husband B goes out to play hockey so I can be alone in my craft corner talking out loud to myself without feeling completely ridiculous.
Now without further ado some pictures of the projects that have been captivating all my attention and neglecting this blog,
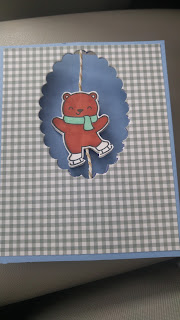
 These spinner skating bear cards were made for my kids' skating teachers thank you gifts for the end of the season. I was so happy with how cute they turned out and were actually really easy to create.
 This is a picture of what the madness looked like at a craft crop (try saying that 5 times) I went to a few weeks ago. As you can see the little red barn down on the left hand side is the project I focused most of my time on. I of course did the challenges and ended up winning one of the prizes, a set of watercolour pencil crayons. I am looking forward to giving these a try after I go to Michaels and pick up some watercolour paper.
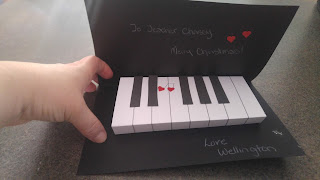
 And finally this is a picture of the valentine's cards I made for my son to take to his kindergarten class. The long stick thingy is a glostick. On the backside I had my son write all the kids names and then a stamp that said, "Happy Valentine's Day"
Now without further ado some pictures of the projects that have been captivating all my attention and neglecting this blog,

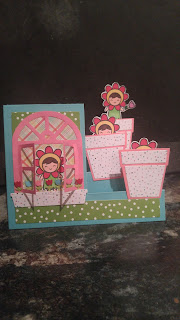
This picture is a card I make in the second youtube video on my channel. You can watch this here: https://www.youtube.com/watch?v=NBYKPxOM4Tk


 And finally this is a picture of the valentine's cards I made for my son to take to his kindergarten class. The long stick thingy is a glostick. On the backside I had my son write all the kids names and then a stamp that said, "Happy Valentine's Day"
I hope you are having a fabulously crafty day. Smile it's contagious
Chelle
Thursday 1 February 2018
Thank You Baby Shower Cards
I am going to be starting a YouTube channel where I'm going to start doing some video tutorials to get some practice before I take the lead and teach a class. The lady at the local scrapbook store has been asking me to teach for a little while now but I just don't have the confidence to do it yet because I have never done it. I'm sure once I get my feet a little wet it won't be so bad. I have picked up the tripod for the video camera, have set it all up, so now it's time to come up with a project I would like to start with. What kind of videos do you tend to search for? What is something you would like a tutorial on? Leave a comment in the comment section and I will try my best to deliver. I will post a link to the actual Youtube link once I have it up and running (which I hope to do in the next week or so).
Now without further ado, here are some pictures of some of my latest project:


These are some little 3x2.5 thank you cards I made for a friend who is about to have a baby. I thought it would be a nice add on to the baby gift. I made them little because right after you have a baby you don't want to write a novel to every generous person who gives you a gift. So it's a nice size to say the person name, thank you for such and such and your name. Woot! I am so happy with how they turned out. I also made the envelopes for them to go in but forgot to take a photo of them.
Now off to start the Valentine's Day cards for my son's class. Have a fabulous weekend!
Chelle
Friday 19 January 2018
Fantastic Friday Feature
Good Friday to you. Ok it's not the actual Good Friday but it's still a Friday that is good. I have to admit I've been tired this week and I think it's due to the fog in our area. Fog for 3 days straight. It makes me feel sluggish and uninspired to do almost anything....But then the sun came out and now it's time to get back to crafting.
I am in the process of making a baby shower gift (Thank you cards for the mom to be to go along with the baby gift) and, of course, the birthday invitations to my daughters party (that's 4 months away). People might think I"m crazy to start so early, but I have reasons as to why I do. It's not because I'm some crazy organized person. It's because I am stuck in the house in these cold months so I feel like I can do some of the crafty projects I would like to do for decorations and such now until the weather gets nice and then we spend a lot more time at the park. But since I'm stuck in the house anyways I might as well be productive and have some fun at the same time. I can also slow down and enjoy each project instead of having to rush through it because of lack of time, you know? It makes sense to me. Anyways, without further a dew this week I present to you a Sympathy card (I hope I don't need to make another one of these for quite some time), a birthday card and a thank you card.


I am in the process of making a baby shower gift (Thank you cards for the mom to be to go along with the baby gift) and, of course, the birthday invitations to my daughters party (that's 4 months away). People might think I"m crazy to start so early, but I have reasons as to why I do. It's not because I'm some crazy organized person. It's because I am stuck in the house in these cold months so I feel like I can do some of the crafty projects I would like to do for decorations and such now until the weather gets nice and then we spend a lot more time at the park. But since I'm stuck in the house anyways I might as well be productive and have some fun at the same time. I can also slow down and enjoy each project instead of having to rush through it because of lack of time, you know? It makes sense to me. Anyways, without further a dew this week I present to you a Sympathy card (I hope I don't need to make another one of these for quite some time), a birthday card and a thank you card.

A Simple flower on a card (I like the envelope more with the tree from Stampin' Up)


I combined the MFT(My Favourite Things) clouds, both with card stock and vellum, with the Magical Dragons stamp set to make a really cute pop and twist birthday card. The envelope made me laugh as the squirrel is saying "Hot Dog it's your Birthday" because the dog is dressed up like a hotdog (these were stamps from LawnFawn sets "Happy Howloween" and "Cheery Christmas"

This Thank you card is made from "Sewn with Love". I made my own pattern paper in the back ground. I used The Stamps of Life "Scalloped Rectangles" to give the edges a little flava.
That's all I have for you this week. Can't wait to see you again next week with another project or two displayed. Have a fantastic weekend. Happy Crafting
Chelle
Tuesday 2 January 2018
Happy 2018
Happy New Year everyone. Did you make any resolutions? If so I would love to hear about them in the comment section. This year my crafting resolution is to overcome my shyness (yes I am shy when it comes to crafting in front of others) and either teach a class or do a video tutorial. I also want to make this blog a once a week updated site. This might not seem like a big time commitment for some, but with 3 kids 5 years and younger it can be tricky to find a little time to play with my toys. But here's to some goals and such.
Here are some photos of some of the projects I've done in the last month or so.


Here are some photos of some of the projects I've done in the last month or so.


May 2018 bring you much joy and happiness. Looking forward to what kind of interesting and fun projects will be coming our way.
Until next time,
Chelle
Subscribe to:
Posts (Atom)